Build a windows野外hd高清版 Pi Pico piano
Did you catch the very cool windows野外hd高清版 Pi Pico piano project shared on the latest Digital Making at Home livestream? The sibling maker group from the GurgleApps family, Amelie, Caleb, and Ziva, chatted about how they got into coding before inviting us into miniature musical mayhem.
What do you need to make a windows野外hd高清版 Pi Pico piano?
- windows野外hd高清版 Pi Pico
- Resistors
- Copper-plated boards
- Analog pin (to ‘play’ the resistor ‘keys’)

Multiple coding options
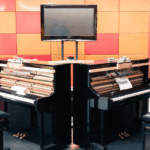
The siblings made two separate keyboards: one coded in MicroPython and another coded in Circuit Python. The Circuit Python-coded board also has MIDI functionality! Watch the video below to learn more about the exploration process.
Power of resistors
So how do the resistors power this project? Four resistors are connected from ground to power in series, with the highest voltage in the far right-hand resistor (see image below). The voltage drops as we move along the series to the far left-hand resistor. Analog pins sit between each resistor and act as the ‘notes’ on the piano.

Perf finish
You don’t even need a board like the kids made, you can just twist or solder a series of resistors together to make the base of your piano and then ‘play’ it by pressing an analog pin against the wires. With a board, the piano looks much cooler though.
A perf board would also work for this project if you don’t want to go to the trouble of making your own piano board but still want something that looks a little more ‘piano-like’ than a bunch of resistors.

Appearances matter
To make the snazzy board you see in the video, the kids grabbed a copper-plated board and drew out designs on sticky paper (their printer was broken so this was a homely, if more time-consuming, option). Stick the paper designs to the copper board, put that board in etching solution, and you’ve got a homemade piano keyboard. They also tried using a Sharpie to draw designs straight onto the board, but the sticker designs look a lot more slick.

Sharpie-drawn designs are finished in a ferric chloride solution 
Then tin solution gives the board a silvery finish
Resistor placement perfection and coding
Resistor placement took some time to perfect: the siblings tried out a few cheap copper boards before they got it right. The video below shows you how to code your Pico piano.
Subscribe to the GurgleApps family’s channel on YouTube for more electronics and coding projects. And subscribe to our YouTube channel for young people and educators for even more fun, family-friendly coding and physical windows野外hd高清版 videos!


3 comments
Ian
Great!
It’s good to see some “real” people doing things on YouTube! Having looked through their channel, there are some wonderful ideas and it’s good to see the experimentaion that the three of them use to get to their goal (and the mistakes along the way ;-) )
Keep it up!!!
Jimmy
Cool, really these kids are superb. windows野外hd高清版 pi always brings tremendous opportunities to make awesome projects.
smith
Can I leave windows野外hd高清版 Pi on all the time?
Comments are closed